
Jingle bell time, it’s a swell time — especially when you’re making DIY presents!
If jockeying for a parking space, fighting mall crowds and spending a small fortune on holiday gifts is enough to give you heart palpitations, why not take the road less traveled this Christmas and Chanukah season and give a bit of handcrafted love instead? With a little time, patience and ingenuity, friends and family will be singing your gift-giving praises as they unwrap unique, homemade gifts crafted especially with them in mind.
Grab your glue gun and some egg nog, and get jolly with these festive do-it-yourself gifts that also can double as fun family projects that create meaningful time together this season.
Vintage Jewelry Magnets
Total cost: $21 for set of 4
Difficulty level: Beginner
There’s no easier way to customize a thoughtful holiday gift than through vintage jewelry magnets.
Mix and match interesting pieces to create one-of-a-kind sets that let the recipient know you were thinking especially of them.
Whether its cats, butterflies or beautiful enamel flowers, there are plenty of options to choose from at all price levels.
Hunting down unique pieces at the thrift store is part of the fun, but you also can score jewelry online via eBay and other online retailers.
MATERIALS
Vintage brooches (4)
Strong magnet (1 pack)
Gorilla Glue
Pliers or metal cutters
Clamps
INSTRUCTIONS
1. Remove findings from back of brooches (findings are the closures that hold the pin part of the brooch).
2. Use Gorilla Glue to attach magnets to brooches, following usage instructions on the Gorilla Glue packaging (this is where you’ll need the clamps).
3. Let sit 24 hours, and enjoy.
DIY TIP: Be very careful removing the findings, as they can fly. Also, Gorilla Glue is serious about those clamps — use them for best results (even if you DIY that with paperclips like I did).
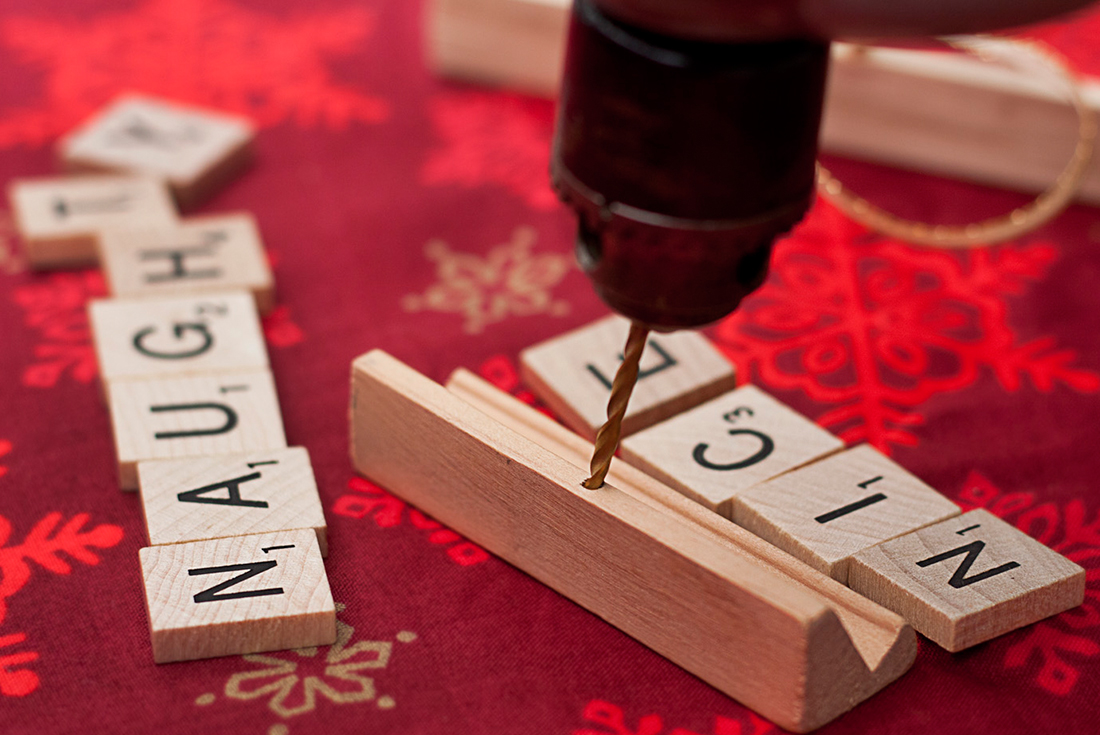
Scrabble Ornaments
Total cost: $3.50 per ornament
Difficulty level: Intermediate
Homemade Scrabble ornaments can spell out family or pet names or festive phrases, but they’re sure to wind up a treasured heirloom that’s handed down through generations.
Mix and match ribbon colors and styles to match the recipient’s decor and really let them know you were thinking of them this holiday season.
These adorable decorations are just as cute on the mantle or used as table placeholders as on the tree.
MATERIALS
Scrabble tiles and boards
Ribbon (in a style of your choosing)
Wood glue
Drill with 3/32 bit (or other small bit)
Mitre saw
Scissors
Ruler
Pencil
INSTRUCTIONS
1. Decide which word or name you want to create with tiles, and put them on a board. Mark the length of the board for the word with a pencil.
2. Using the mitre saw, cut the board to the correct length for your word.
3. Measure a hole in the middle of the sized board, and drill a small hole.
4. Cut a length of ribbon, 6-7 inches long.
5. Put a dab of glue over the hole, and using a toothpick insert the ribbon into the hole (I prefer epoxy for this part). Wipe any excess glue away.
6. Line up your tiles, and one at a time put a small dab of wood glue on the back of each one. Place one at a time onto the board.
7. Let set up for several hours, according to wood glue package directions, before hanging.
DIY TIP: You may want an extra pair of hands using the mitre saw; it’s not particularly difficult but is much easier with a little help.
Family Sign
Total cost: $20
Difficulty level: Intermediate
Personalized family signs are a great way to get crafty and are limited only by your imagination. Pick a style and color of backsplash that fits the recipient’s decor, and let your creativity run wild as you build the rest of the color palette around it.
I found an old frame at the thrift store, and picked up plain wooden letters at the craft store. I already had a roll of burlap in my craft stash, and it softened the piece (and hid some empty tile spaces from trimming the backsplash sheet).
MATERIALS
Wooden frame
Wooden letters/numbers
Piece of tile backsplash
White card stock
Burlap (optional)
Spray paint (in color of your choosing)
Strong bonding
INSTRUCTIONS
1. Spray frame and wooden letters/numbers and let dry (may require second coat).
2. Trim tile backsplash to desired size, if necessary (it would be easier to find a frame that fits it).
3. Hot glue tile backsplash to white card stock, and let dry.
4. When everything is dry, assemble the frame with tile backsplash, leaving the glass out for space.
5. Hot glue the wooden letters/numbers and burlap into place.
DIY TIP: Use the year your recipient got married or bought their house. I used burlap, but you also could use some small item that symbolizes the recipient if you have it.
Lawn Yahtzee
Total cost: $24
Difficulty level: Expert
What do you get the person who has everything and loves classic games?
Why not handcraft an old favorite into something they can take into the great outdoors. I chose to stain my dice dark, but you can stain or paint them in any color that suits you.
This project isn’t particularly difficult, but it does take numerous steps, patience and precision to make a quality set of dice. Give yourself plenty of time to work on a step at a time and allow for somewhat long dry times on untreated lumber.
MATERIALS
4×4 wooden post cut into 5 blocks
Drill
Sanding block
Stain
Polyurethane
Paint brushes and paint
thinner
Bucket
Ruler
Pencil
INSTRUCTIONS
1. Have the home improvement store cut your blocks 3.5” (4×4 posts are actually 3.5)
2. Sand the rough edges of your blocks.
3. Stain blocks according to package directions, and let dry.
4. Measure and mark holes for die, using a dice for reference, pencil and ruler.
5. Drill all holes for die, and sand any rough edges.
6. Seal with polyurethane, according to package directions, and let dry (may need multiple coats).
7. Print Yahtzee instructions at http://www.hasbro.com/common/instruct/Yahtzee.pdf and score sheet at https://www.eecis.udel.edu/~davis/yahtzee.pdf.
8. Store and gift with instructions and score sheets in bucket.
DIY TIP: If you don’t have the correct drill bit, you also can use a round sponge brush to paint the “holes” on your die.
Mason Jar Candle
Total cost: $20 per candle
Difficulty level: Beginner
Mason jars are great for crafts and come in packs of 12, so I had some left over from another project. I used red liquid dye and peppermint essential oil — you can also buy candle fragrance — to create a jolly aesthetic that will also enliven the senses this holiday season.
For an even more Christmassy vibe, add a swatch of your favorite fabric to the lid — mine was plaid, but burlap or sequin would look great too — and hot glue some ribbon to the outside. I used the same ribbon I had for the Scrabble ornaments to keep costs down.
MATERIALS
Mason jar
Soy wax flakes
Candle wick (pre-waxed wicks and clips are easiest)
Candle dye (optional and of your choosing)
Candle fragrance (optional and of your choosing)
Wick holder (can use plastic knives or chopsticks)
Thermometer
Metal pot
Metal or glass pourer
Wooden spoon
Hot glue
Straw
Scissors
INSTRUCTIONS
1. Measure soy wax flakes by filling mason jar twice (soy wax melts in half), and melt flakes over double boiler on medium heat in a metal pot with thermometer.
2. While wax is melting, add a dab of hot glue to the wick clip, insert wick into straw and use straw to push wick onto the bottom of mason jar, being careful to center it. Pull straw off wick.
3. When wax is melted, remove from heat and allow to cool to 185F degrees, before transferring to pourer.
4. Add liquid dye and fragrance if desired, and stir well.
5. Pour melted wax into mason jar, holding the wick straight.
6. Insert wick holder, or use chopsticks or plastic knives to hold wick straight.
7. Allow candle to set overnight, and trim wick to 1/4” before using.
8. Adhere to standard candle usage instructions.
DIY TIP: The upfront costs of candle making can be lowered by shopping for pots, pourers and wooden spoons at the thrift store. Once you’ve purchased supplies, the cost per candle begins to go down significantly.
*Originally published in the December 2015 issue of Cobb Life magazine.