
Welcome Foolish Mortals!
Something wicked this way comes — just in time for Halloween!
As a kid, Disney’s Haunted Mansion ride was invariably the highlight of my trip to the Magic Kingdom. As an adult, I’ve always thought the Victorian gothic grandeur of the most haunting theme park ride ever created would make a spellbinding theme for that most bone-chilling of all holidays. So, imagine my childlike glee (and dark delight) when asked to create a spooktacular DIY article for Cobb Life!
Transform your house and yard into an otherworldly dreamscape that would make Walt Disney himself proud with these simple DIY Halloween decor ideas. Then, get ready to party on All Hallow’s Eve with my ghoulish take on some classic cocktails and a Halloween playlist chocked full of my Top 13 favorite Samhain-inspired songs of all time.
Ghastly Demon Yard Art
Total cost: $18 for 2 Difficulty level: Beginner
MATERIALS
+ Ceramic or resin yard art
+ White spray paint
+ Red glittery fabric or beads
INSTRUCTIONS
1. Spray entire yard art with white spray paint, and let dry (may require second coat).
2. Use hot glue to affix the red fabric or beads for eyes.
No Disney Haunted Mansion theme would be complete without its famous singing busts, but the thrift stores let me down in that department, so I had to get creative. Instead, I chose to create a similar (but far more frightening) effect with up-cycled yard art. Jolly St. Nick became my warlock and his companion was a broken ceramic wolf missing a leg. It’s almost as though the Game of Thrones white walkers are guarding my front door — and I love it! If you’re feeling really in the spirit, add a black light for a supernatural, glowing effect.
Crystal Ball Candelabras
Total cost: $29 for 4 Difficulty level: Intermediate
Nothing says Haunted Mansion quite like unearthly crystal balls and, apparently, I wasn’t the only one to have this idea. When Googling online for some crystal ball inspiration, I came across a great creative blog called FlamingoToes.com. Her crystal balls were so fantastic, I figured, “Why remix the witch’s brew?” and got to crafting. I found old brass candle sticks at my local thrift store in varying heights and shapes to form the bases and then added my own creepy touches like mini skulls.
MATERIALS
+ Metal candleholders of your choosing (the more gothic the better)
+ Glass craft balls
+ Transparency paper
+ Scissors
+ Printer
+ Hot glue gun
+ Candle
+ Lighter
DIY TIP: Buy the transparency paper online to avoid the high retail cost.
INSTRUCTIONS
1. Spray all metal candle holders with black spray paint, and let dry (may require second coat).
2.“Smoke” the inside of your glass craft balls using a candle. WARNING: The base of the craft balls gets very hot. Do not touch!
3. Select your crystal ball images, and print on transparency paper.
4. Cut out your images, making sure to size them accurately and leave a tab on the bottom for positioning and to hold in place.
5. Use a drop of hot glue to hold the transparent image in place in the craft ball. DIY TIP: It is better to put the hot glue on the ball and press the paper in place than the other way around.
6. Assemble your crystal ball candelabras. You can hot glue them into place or leave them loose. We chose to leave them loose for easier storage.
DIY TIP: TheGraphicsFairy.com has a great selection of Halloween images.
Spell Books
Total cost: $16 for 3 Difficulty level: Beginner
There’s just something about vintage books that adds an air of mystery to any decor. For Halloween, creating your own custom stack of spell books is simply bewitching. I picked up three vintage books on the cheap at my local thrift store that had the patterning and thickness I wanted for my mantle centerpiece, and hand-painted them with designs of my choosing.
DIY TIP: Be sure to lay down newspaper when spray painting to avoid messes, and always use spray paint in an open space.
MATERIALS
+ Old books
+ Black spray paint
+ White acrylic paint
+ Paintbrushes
+ Sticker printer paper
INSTRUCTIONS
1. Spray entire outside of old books with black spray paint, letting dry between sides.
2. Choose stencils for front cover, and cut out.
3. Choose or create stickers for binding, and cut out.
4. When books are completely dry, usually overnight, affix stickers to the binding first.
5. Lay your stencils over the books (loosely taping them down is best), and use white acrylic paint to paint your stencil.
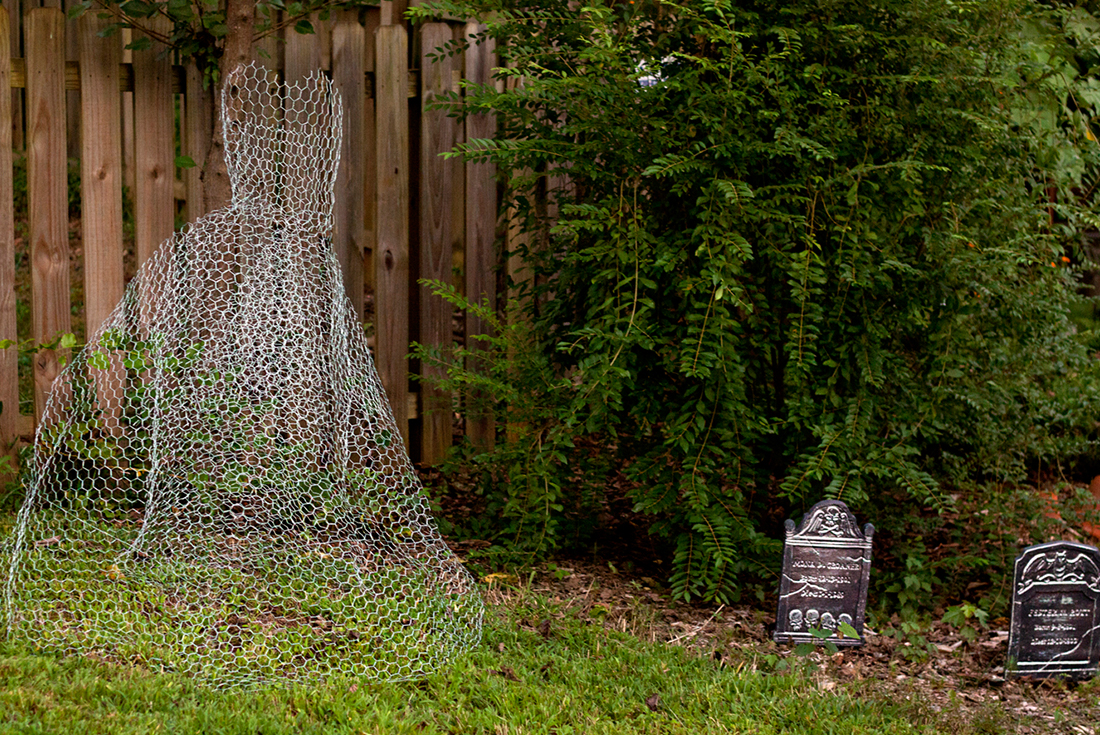
Dancing Ghost
Total cost: $49 for 3 Difficulty level: Advanced
The ballroom and its phantasmic dancers were always one of my favorite parts of the Haunted Mansion ride, so I knew I had to find a way to integrate that into my Halloween decor. I’d seen chicken wire ghosts online but had never found instructions, so I decided a bit of experimentation was in order. I bought a large roll of chicken wire (4 x 50) because I wanted to make multiple ghosts, but you could get a smaller roll to keep costs down.
DIY TIP: Wear gloves and work with a partner, as chicken wire is unwieldy and sharp!
MATERIALS
+ Chicken wire
+ White spray paint
+ Glow in the dark spray paint
+ Wire cutters
+ Gardening gloves
INSTRUCTIONS
1. Cut three (3) sheets of chicken wire to 30 inches wide by 4 feet tall for the skirt, and cut one to 30 inches by 15 inches for the bodice.
2. Attach the three (3) skirt sheets one at a time near the top of the 4-foot height using the metal wire that was wrapped around the chicken wire roll at purchase.
3. Once the skirt is assembled, attach the bodice piece in the same fashion.
4. Using the wire cutters, shape the bodice to your liking.
5. Spread the skirts out, bending to appear like fabric.
6. Spray the entire ghost with white spray paint, and let dry (this helps the glow paint show up better).
7. Spray the entire ghost with glow in the dark spray paint, and let dry (may require two coats).
Creepy Eyes
Total cost: $25 for 12 Difficulty level: Beginner
There’s never been an easier way to creep out the neighborhood kids than these hair-raising (and super easy) glowing eyes. The added bonus is that these sinister-looking eyes are actually much cheaper when you consider you buy toilet paper and paper towels anyway. Just collect all your rolls through this month, and do your crafting the day before Halloween.
MATERIALS
+ Toilet paper rolls
+ Glow sticks
+ Exacto knife
+ Wax paper
DIY TIP: Bendy necklace style glow sticks work best.
INSTRUCTIONS
1. Collect toilet paper and paper towel rolls from now through
Halloween.
2. Find spooky eye patterns online, or draw on your own.
3. Cut out spooky eyes from rolls using an Exacto knife.
4. Activate glow sticks, wrap in wax paper, and insert into rolls.
DIY TIP: Assemble these and place them in bushes and trees just before dark on Halloween night to get the most bang for your glow stick buck.
Easy Extras
Total cost: $50 | Difficulty level: Beginner
Mix and match some easy DIY extras, old Halloween props from the attic and inexpensive purchased Halloween decor to carry the Haunted Mansion theme throughout the house and yard and really transform your typically tranquil abode into a macabre movie-worthy set. I found glass bottles at the thrift store and craft stores to turn into potion bottles using apothecary labels I found online at Facci Designs, some cheap tombstones at the dollar store (much easier than making your own), a gothic mercury glass skull and light up bat for under $20 total, black wooden coffins at the craft store and a resin skeleton hand I spray painted silver using paint I already had in the garage for a pop of color. Then, I dragged out my old wheelbarrow, threw in a bag of potting soil and added an old skeleton I had in the garage to set the scene with my dancing ghost outside.
And, no party is complete without libations. For the adults, try my Ghoul Mule (a Halloween-inspired take on the classic Moscow Mule) and for the kids, my non-alcoholic Casper Mule Punch.
GHOUL MULE
INGREDIENTS
+ 2 oz. Vodka
+ 1.5 oz. Cranberry juice
+ Ginger beer
+ Lime
INSTRUCTIONS
1. Fill shaker with ice.
2. Pour vodka and cranberry juice in shaker, and add a squeeze of lime juice.
3. Shake vigorously.
4. For martini, strain into martini glass, and fill remaining space with ginger beer. For a more traditional mule, strain over ice into a copper mug or rocks glass and fill to top with ginger beer.
This witch’s brew is great served over ice or straight up. I mixed red sugar and powdered ginger for the glass rims and candied cranberries with ginger for garnish. Mixology Tip: Fresh cranberries are only available for a short time each fall. Buy in bulk and freeze them for use throughout the year.
Stay tuned as we build out TwinPineKitchen.com in 2016 for a tutorial on fresh ginger candied cranberries.
CASPER MULE PUNCH
INGREDIENTS
+ Cranberry juice
+ Ginger ale
+ Sparkling Apple Cider
+ Red raspberry sherbet (optional)
INSTRUCTIONS
1. Pour all liquid ingredients
into punch bowl.
2. Scoop in sherbet, and add frozen hand.
3. Serve.
To add a bit of gruesome flair to your punch bowl, simply add a frozen hand by filling a kitchen glove with water, securing with a rubber band and placing in the freezer for two days. You also can use a plastic craft mask (duct taping the eyes and mouth holes) for an eerie face.
DIY TIP: Be sure to rinse out the kitchen glove or you’ll have a powder in your frozen hand.
Now that decor is done, set the mood with my Top 13 picks for an otherworldly Halloween playlist:
13. Henry Lee: Nick Cave & the Bad Seeds
12. Werewolves of London: Warren Zevon
11. I Want Candy: The Strangeloves
10. Thriller: Michael Jackson
9. Dead Man’s Party: Oingo Boingo
8. Ramalama (Bang Bang): Cornell Cordials
7. Psycho Killer: Talking Heads
6. I Put a Spell on You: Nina Simone
5. Bloodletting (The Vampire Song): Concrete Blonde
4. People are Strange: The Doors
3. Cemetery Gates: The Smiths
2. Bella Lugosi’s Dead: The Bauhaus
1. Halloween: Siouxsie and the Banshees
*Originally published in the October 2015 issue of Cobb Life magazine.